
Did you know that Oracle Linux is also available for ARM processors? That means that you can install Oracle Linux on an SD card for a Raspberry Pi as well. Below I will show you how to do that with a Mac.
tl;dr
- Download the latest Oracle Linux image for ARM
- Uncompress the image with
xz, for example:xz -dkv rpi3-ol7.6-image-20181116.img.xz - Flash the SD card with the Oracle Linux image, using
dd, for example:dd if=rpi3-ol7.6-image-20181116.img of=/dev/disk2 bs=16000000 - Put the SD card into your Raspberry Pi and boot it up
Downloading and uncompressing the image
Downloading the image is straight forward. Just go to the Oracle Linux for ARM downloads page and download the latest image. You can also get it, for example, via wget http://download.oracle.com/otn-pub/otn_software/linux/rpi3-ol7.6-image-20181116.img.xz:
$ wget http://download.oracle.com/otn-pub/otn_software/linux/rpi3-ol7.6-image-20181116.img.xz
--2019-03-14 23:22:42-- http://download.oracle.com/otn-pub/otn_software/linux/rpi3-ol7.6-image-20181116.img.xz
Resolving download.oracle.com... 184.29.106.250
Connecting to download.oracle.com|184.29.106.250|:80... connected.
HTTP request sent, awaiting response... 302 Moved Temporarily
Location: https://edelivery.oracle.com/otn-pub/otn_software/linux/rpi3-ol7.6-image-20181116.img.xz [following]
--2019-03-14 23:22:42-- https://edelivery.oracle.com/otn-pub/otn_software/linux/rpi3-ol7.6-image-20181116.img.xz
Resolving edelivery.oracle.com... 104.100.49.102
Connecting to edelivery.oracle.com|104.100.49.102|:443... connected.
HTTP request sent, awaiting response... 302 Moved Temporarily
Location: http://download.oracle.com/otn-pub/otn_software/linux/rpi3-ol7.6-image-20181116.img.xz?AuthParam=1552631082_0be53ad65732e73e53791e1326387a31 [following]
--2019-03-14 23:22:42-- http://download.oracle.com/otn-pub/otn_software/linux/rpi3-ol7.6-image-20181116.img.xz?AuthParam=1552631082_0be53ad65732e73e53791e1326387a31
Connecting to download.oracle.com|184.29.106.250|:80... connected.
HTTP request sent, awaiting response... 301 Moved Permanently
Location: https://download.oracle.com/otn-pub/otn_software/linux/rpi3-ol7.6-image-20181116.img.xz?AuthParam=1552631082_0be53ad65732e73e53791e1326387a31 [following]
--2019-03-14 23:22:42-- https://download.oracle.com/otn-pub/otn_software/linux/rpi3-ol7.6-image-20181116.img.xz?AuthParam=1552631082_0be53ad65732e73e53791e1326387a31
Connecting to download.oracle.com|184.29.106.250|:443... connected.
HTTP request sent, awaiting response... 200 OK
Length: 279309592 (266M) [text/plain]
Saving to: 'rpi3-ol7.6-image-20181116.img.xz'

rpi3-ol7.6-image-20181116.img.xz 100%[================================================================>] 266.37M 7.80MB/s in 32s

2019-03-14 23:23:14 (8.39 MB/s) - 'rpi3-ol7.6-image-20181116.img.xz' saved [279309592/279309592]

$
Once downloaded, you will have to extract the image, which is in compressed xz format.
$ xz -dkv rpi3-ol7.6-image-20181116.img.xz
rpi3-ol7.6-image-20181116.img.xz (1/1)
100 % 266.4 MiB / 5,120.0 MiB = 0.052 176 MiB/s 0:29
$
The parameters for xz are as follows:
d for --decompress
k for --keep, which doesn’t delete the input file
v for --verbose output
Once you have uncompressed the file you will have a .img file of about 5 GB.
$ ls -alh
total 9217288
drwxr-xr-x   4 gvenzl staff 128B Mar 14 23:26 .
drwxr-xr-x+ 90 gvenzl staff 2.8K Mar 14 23:28 ..
-rw-r--r--   1 gvenzl staff 5.0G Dec 20 03:01 rpi3-ol7.6-image-20181116.img
-rw-r--r--@  1 gvenzl staff 266M Dec 20 03:01 rpi3-ol7.6-image-20181116.img.xz
$
Flashing the SD card with the image
The next step is to get the image onto the SD card. Be aware that the next steps will destroy all information on the SD card, so make sure you have all data that you want to keep copied over to somewhere else! Also note, that the following steps will vary depending on your operating system. For Mac, here it goes as follows:
-
- Put the SD card into your SD card reader.
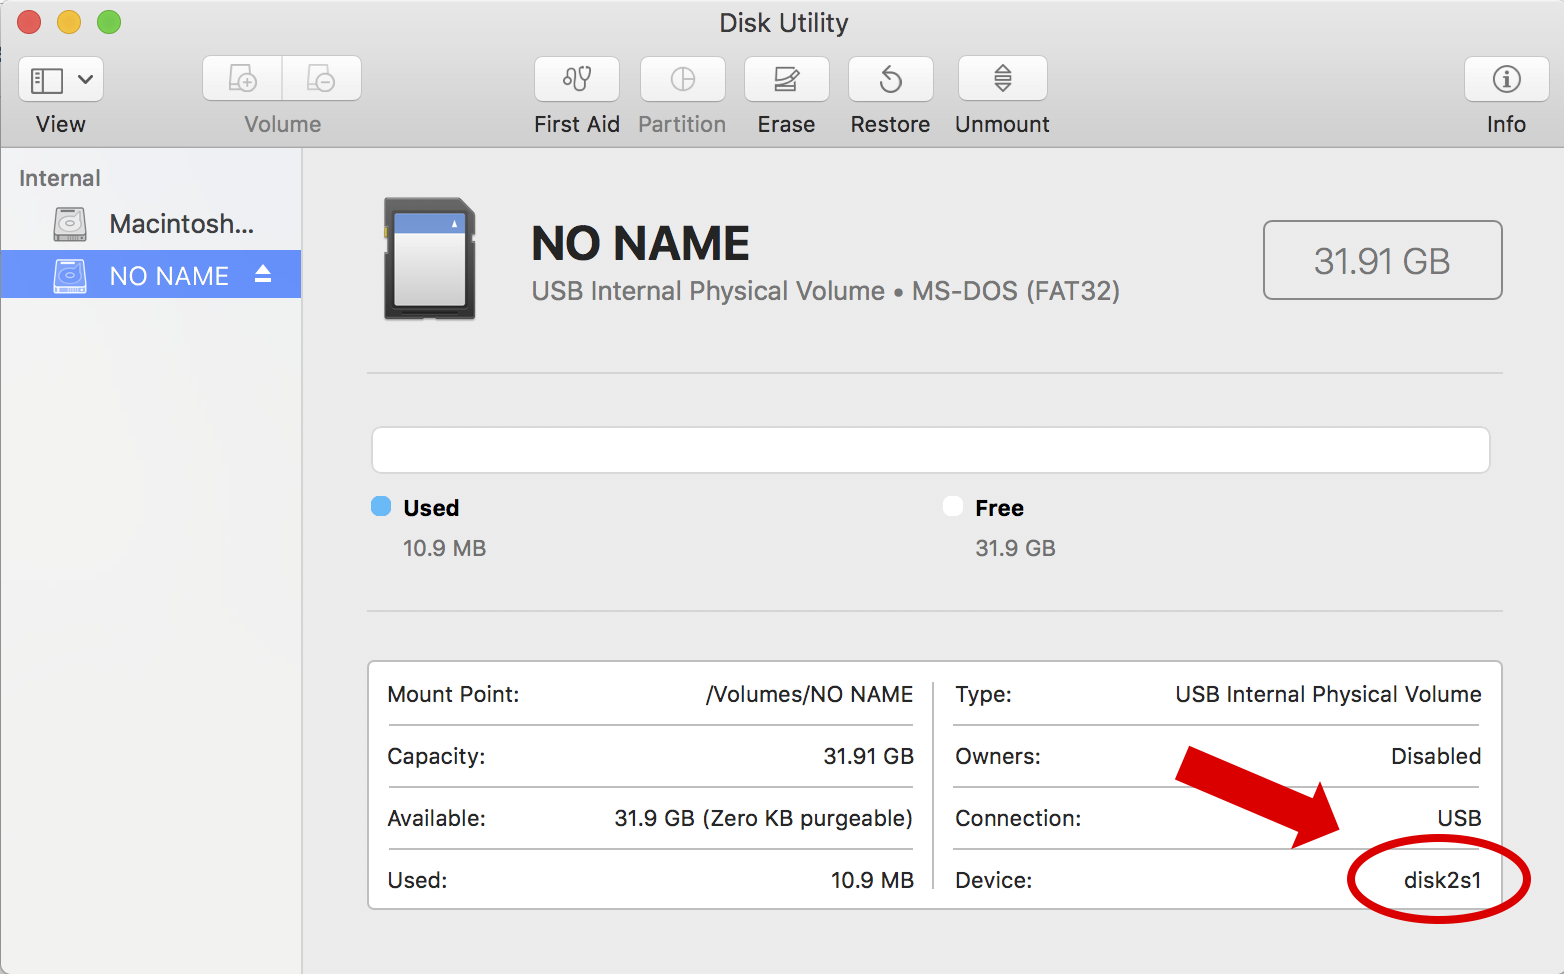
- Open the Disk Utility tool, the SD card should be visible in there, and remember the device at the bottom right for the next step and close Disk Utility again.
- In a Terminal session, unmount the SD card by running
diskutil umount /dev/[device name], for example:$ diskutil unmount /dev/disk2s1 Volume NO NAME on disk2s1 unmounted $
- Image the SD card via the
ddcommand. You will have to know:- The path of the image
- The device name of the device you just unmounted.
Here is where it gets interesting: the device above already has a partition on it, which is FAT32. This is reflected by the s1 part in /dev/disk2s1. You can also see it in the Disk Utility as well. The Oracle Linux disk image is a complete one, not just for a partition. That means that you will have to image the entire disk, not just partition s1. To do so, just leave out s1 and image /dev/disk2 instead. In case that you just see something like /dev/disk2, it means that your SD card hasn’t been formatted yet and you can proceed the very same way, by imaging /dev/disk2.
$ sudo dd if=rpi3-ol7.6-image-20181116.img of=/dev/disk2 bs=16000000
The dd command takes following parameters:
if for the input file, this is the Oracle Linux image for Raspberry Pi
of for the device to write the image to, this is the SD card you just unmounted
bs for the block size to use for a given write operation. In my case I used 16MB but don’t worry too much about it. In theory it can speed up your write operations but you will most likely anyway be limited by the 3-4MB/s that an SD card gives you.
If the dd command finishes without any errors, your SD card has successfully being re-imaged.
$ dd if=rpi3-ol7.6-image-20181116.img of=/dev/disk2 bs=16000000
335+1 records in
335+1 records out
5368709120 bytes transferred in 1146.344940 secs (4683328 bytes/sec)
$
You can now take out the SD card from the SD card reader.
Running Oracle Linux on Raspberry Pi
The rest is business as usual. Put the SD card into your Raspberry Pi and boot it up by plugging in the power. Then log into the Raspberry Pi as the root user with the password oracle. You will have to change the password immediately after you login.
login: root
root's password:
You are required to change your password immediately (root enforced)
Changing password for root.
(current) UNIX password:
New password:
Retype new password:
[root@rpi3 ~]# uname -a
Linux rpi3 4.14.35-1818.3.3.el7uek.aarch64 #2 SMP Mon Sep 24 15:15:19 PDT 2018 aarch64 aarch64 aarch64 GNU/Linux
[root@rpi3 ~]# cat /etc/oracle-release
Oracle Linux Server release 7.6
Have fun with your Raspberry Pi running Oracle Linux. 🙂

You could also flash the SD card with Etcher. I use it all the time to flash Raspberry Pi images onto SD cards.
https://electronjs.org/apps/etcher
LikeLiked by 1 person
Cool, good point, thanks!
LikeLike
Hello Gerald,
Thanks for this post. I installed with your manual Oracle Linux on my RPi with an 32GB SD-Card. When I try to install Oracle XE with your other blogpost on this installation I run in the problem with the small root partition.
The image of the Oracle Linux is 4 GB and that’s not enough for the XE installation. Do you know how I can resize the root partition to the maximum of the SD-Card?
Best,
Carsten
LikeLike
Hi Carsten,
I haven’t tried it in particular with Oracle Linux but have a look here: https://www.raspberrypi.org/forums/viewtopic.php?p=942485
Btw, I doubt that XE will run on the Raspberry, there are no ARM compiled libraries for the Oracle Database.
Thx,
LikeLike
has anyone had any luck installing oracle linux on a rasberry pi 4?
LikeLike
I have double-checked with the Oracle Linux guys and today Oracle Linux doesn’t support the Raspberry Pi 4. They plan to have support with UEK6 but I don’t know the exact timelines for that.
LikeLike
Didn’t work for me on the pi4 or pi zero
LikeLike
It’s available for 4 now https://www.oracle.com/linux/downloads/linux-arm-downloads.html
LikeLike